Some winter love keeps your rosemary thriving

Rosemary in winter 2021

Rosemary is such an amazing herb! It’s part of the mint family, great in sweet and savoury baking, awesome as a part of a rub for beef or chicken, and beautiful in a cocktail or steeped for tea. And it’s healthy for you too! Rosemary contains carnosic acid, a potent antioxidant that is believed to be beneficial for your brain – improving brain health and memory.

Rosemary

In my early gardening years, I would always buy the largest rosemary plant available at the nurseries every spring, grow and harvest for one summer and then discard it. The sad thing is that rosemary doesn’t grow too quickly, and it sure did seem a shame to be tossing it at the end of the season.

If you live in growing zone 8 or above you do not have to concern yourself with overwintering because rosemary can be left out all season in that growing zone, but, for me in zone 6a with my beautiful Canadian winter, keeping rosemary alive outside was not possible. Trust me I tried!


So instead, we have discovered a nifty way to keep that rosemary alive in the winter by moving it either into our garage or into the house for the winter. We have found that we get the best results, though, when we first shock it into dormancy.

Rosemary grown for 2 years
Nursery garden rosemary after one year

In the part of southern Ontario in which I live, we do not have early or harsh winters, which serves us well for keeping this plant. It is very tolerant of cool weather and harsh conditions. We don’t really think about moving our plant inside until it consistently stays below zero, which for our area usually happens sometime in November.

So, every year, we keep the rosemary outside and let it get a frost. Then, we move it to our garage. If the weather turns and gets warm again, we move the rosemary out for some sun. When it gets cold, we move it back in the garage. This pampering can sometimes keep us busy for about a month.

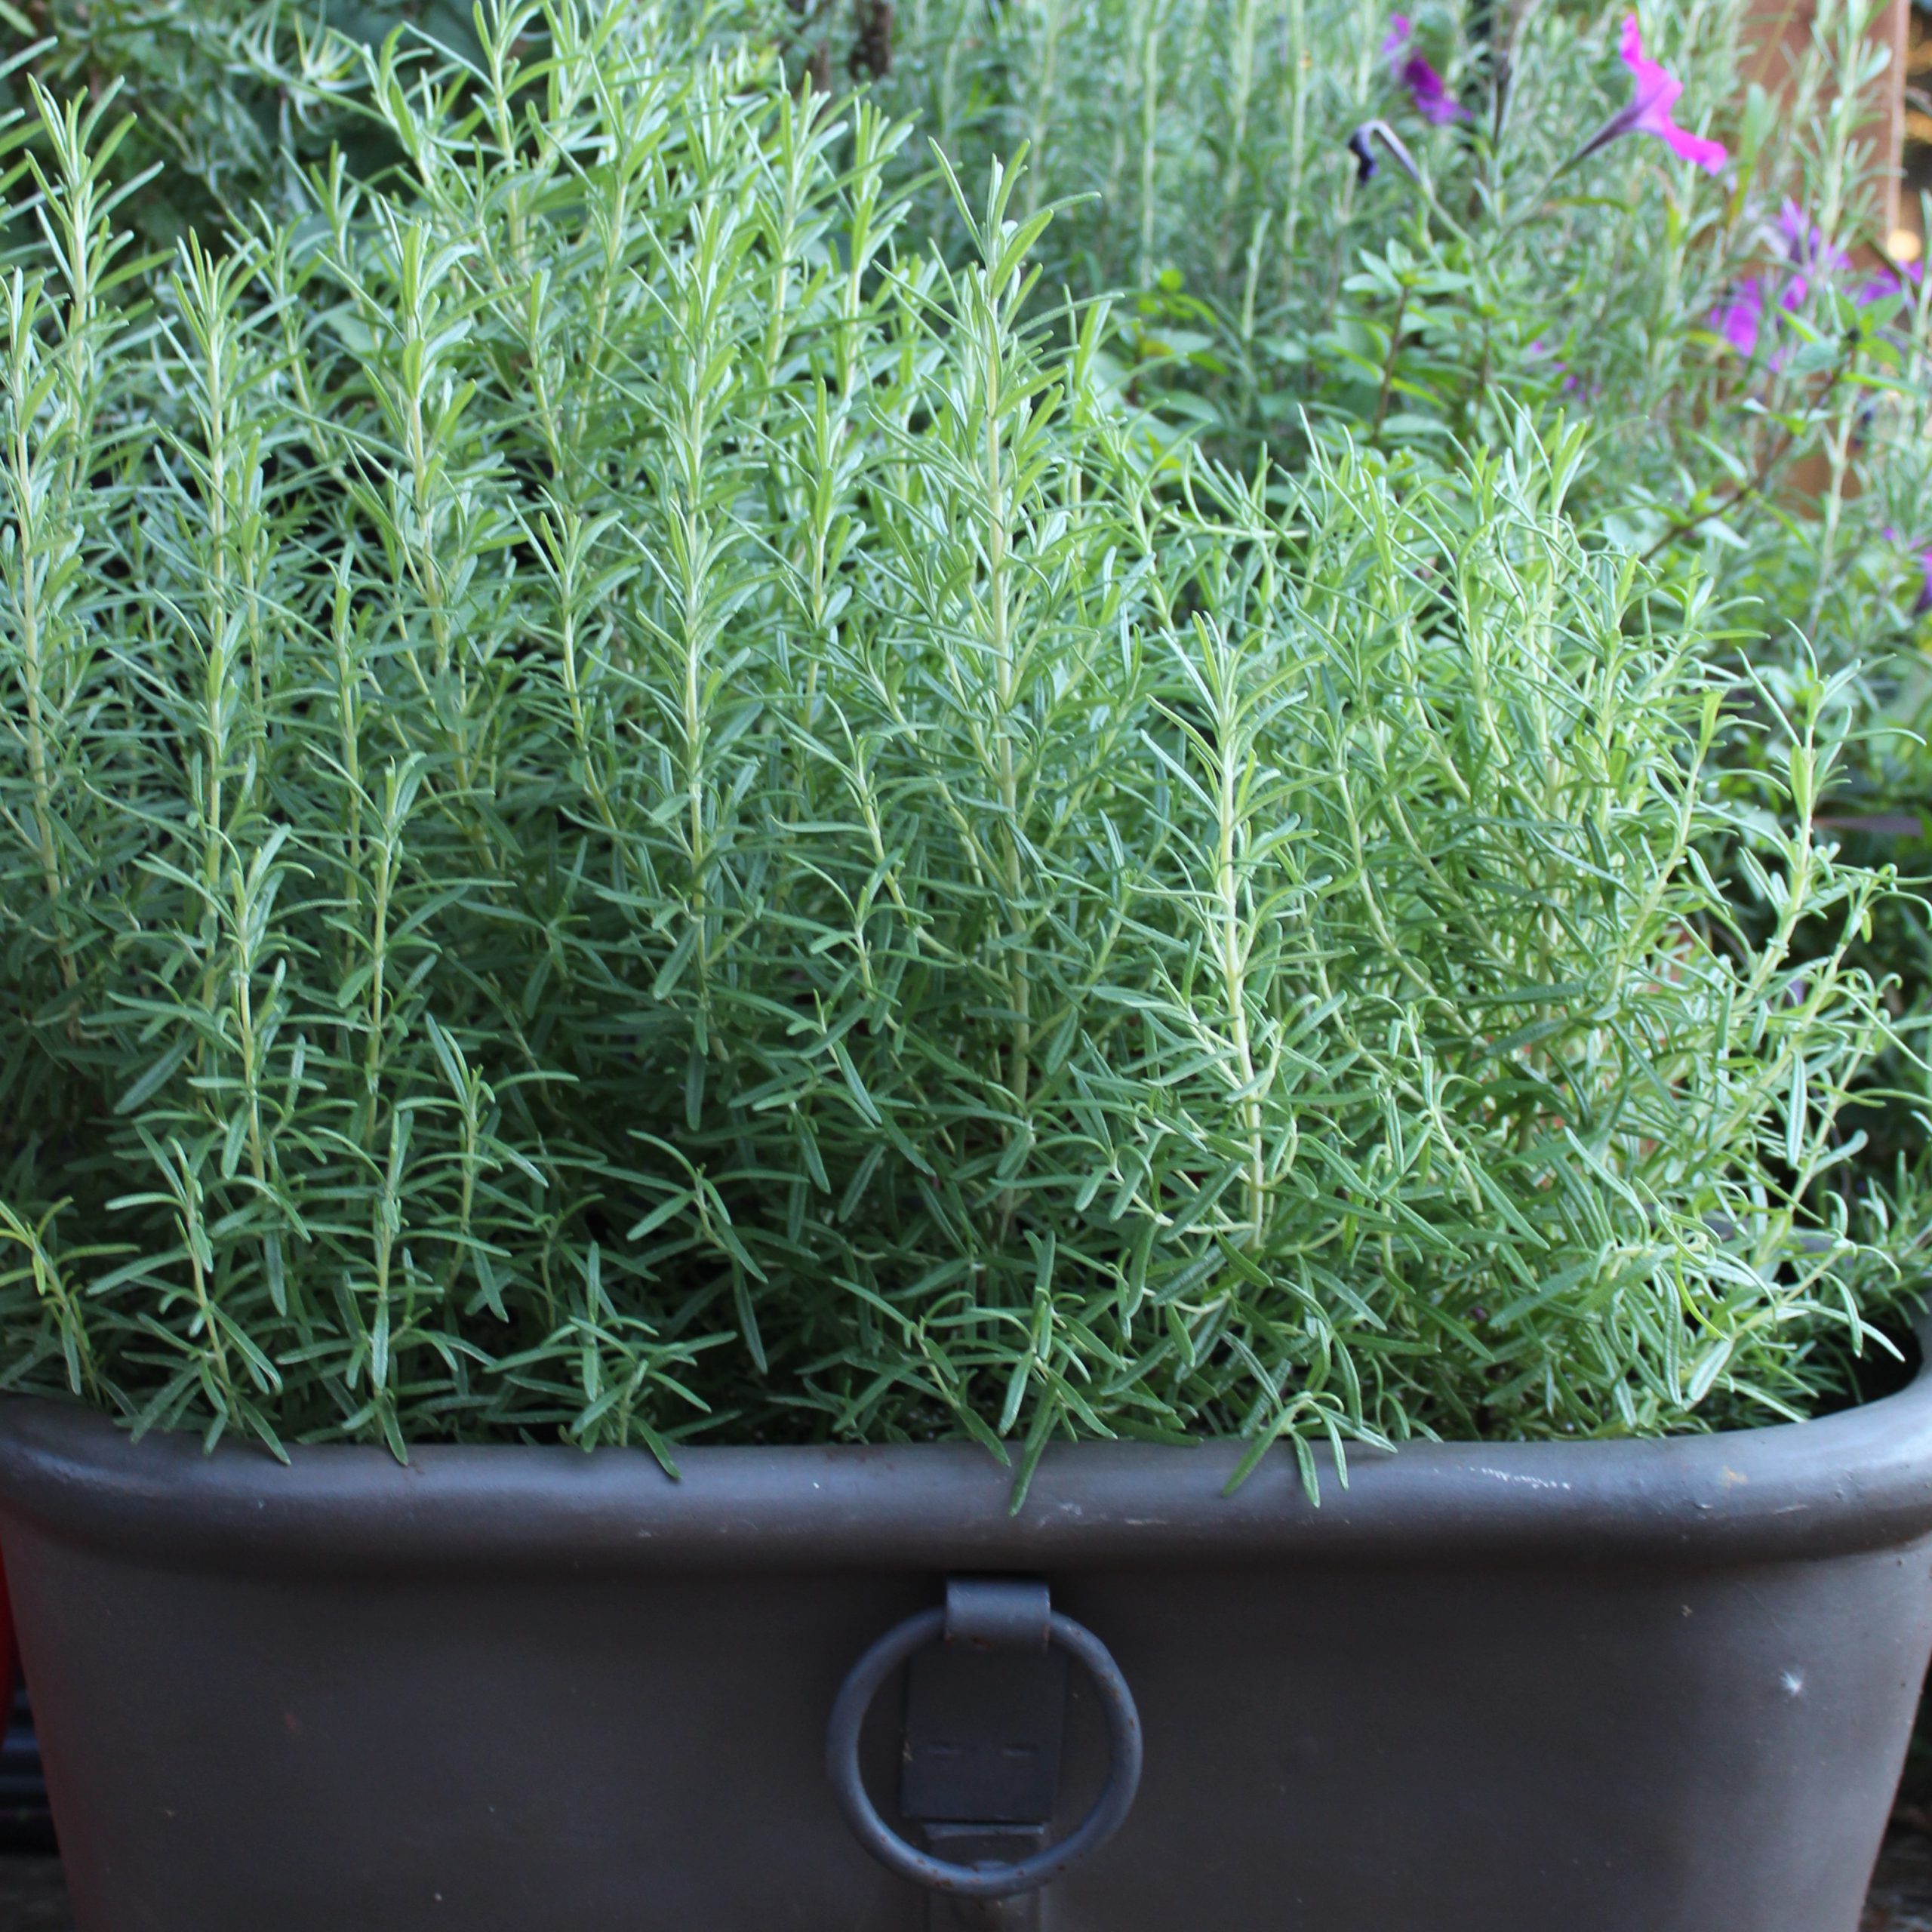
In late December, we get winter and that is when we will leave it in our garage. This year, we left one of our rosemary plants in the garage until the first week of February. We moved it inside when the temperature was going to dip below -20° C. That plant has been in the house for 10 days now, and it is starting to bloom beautiful purple flowers.


In March, when we start to get sunny days above zero, we will take our rosemary plants out for some sun – just an hour or two a day. Once the days are consistently above zero, we will keep the plants out longer, until the beginning of April when we move them outside for the spring and keep them out until the following November.

Rosemary can live a long time this way, decades in fact, and we have rosemary trees that are five years old. Usually after that they get too large to keep moving them around. So, in anticipation of the end of this shrub, we start another plant from a cutting or just purchase a new one from the nursery.

Rosemary is very drought tolerant and it actually takes in moisture from the air through its needles and keeps itself hydrated in the humid summer months. You really do not need to water your rosemary plant too often. In fact, overwatering will stress the plant and potentially kill it, if its “feet” (roots) are too wet. However, you also do not want to completely dry out the soil.


When we have the rosemary plants in the garage from December through to the end of January, we do not water them. Because the plant is not respiring and the soil was damp when we moved them into the garage, the soil does not dry out.  If we take them outside for some sun when the temperature has risen above zero, we water them then.

So, this year when you are planning your garden, pick up a large rosemary plant, grow over the summer, and follow our lead, keeping your plant alive throughout the winter. When spring arrives, like children, you will be happy to see your rosemary outside basking in the sunshine and enjoying your garden!

If you want to see just how healthy my rosemary stays in the winter, check out this video:


Here are some great recipes using fresh rosemary at Cansanity :

Rosemary Smashed Potatoes
Rosemary Smashed
Potatoes

Barbecue Sirloin Roast
Barbecue Sirloin
Roast

Mustard & Rosemary Grilled Chicken
Mustard & Rosemary
Grilled Chicken

Cranberry Meringue Pie
Cranberry Rosemary
Meringue Pie

Rosemary Focaccia
Rosemary Focaccia

Easy Squash Ravioli With Rosemary Oil
Easy Squash Ravioli
With Rosemary Oil

Lemon-Rosemary Roast Chicken
Lemon-Rosemary
Roast Chicken

Potato Pizza With Fresh Mozzarella and Rosemary
Potato Pizza With
Fresh Mozzarella
and Rosemary

Rosemary Grapefruit Vodka Cocktail
Rosemary &
Grapefruit Vodka
Cocktail

Rosemary blooming in winter 2021

Rosemary kept indoors winter 2021 in bloom


Winter is coming….what’s next?

Winter backyard photo
First light snowfall winter 2017

Well, it has been a busy couple of months! For starters, I have added over 150 recipes to the Cansanity website and taken some incredibly interesting photos of delicious food and fun gardening projects, which will be featured in some upcoming blogs. It has been eleven months since I first published the website and I feel I have only scratched the surface on all the gardening and cooking tips that I want to share with you. This is so exciting for me because I am loving this journey. I want to say I am so thankful to all of you for supporting Cansanity by following the posts on all the social media platforms, including Facebook, Instagram, YouTube and Pinterest. You make my day when you like, comment and share the posts and I hope Cansanity has been a wonderful distraction from the COVID-19 pandemic for you; it sure has been for me!

As November draws to a close, I want to share with you some of the ways I put the garden to bed for the winter.  To begin, we have rabbits that frequent our yard in the winter, and so we have found that putting up a temporary fence around the roses protects the bark.


Rabbits 2011

Rabbits have amazing jaws and will gnaw at these plants – thorns and all.  Even though roses are pretty hardy and have withstood considerable damage in past years, I find that protecting them this way gives me peace of mind that the roses will come back strong and healthy the following year. If you grew roses for the first time this year, you should not prune them until the spring. The rose hips that form on the stems signal the rose to go dormant. They may look scraggly this winter but just leave them. In 2021, I will be doing a series of blogs talking about roses.  So, if that is of interest to you, stay tuned.

I have a raspberry patch near the back fence, and once the last leaves fall from the plants, I like to get in there and prune the canes.  By cutting the canes back by a third, I encourage new growth and more berries the following year.  While I’m in there, I will also find those canes that have died, and I remove them, making the patch tidier and more pleasing to look at.

Garlic Planted Fall 2020

For my garden boxes in which I planted garlic, we rake up the leaves and add them to the top of the box. This does two things.  First, it acts as a blanket to protect the soil from wind and rain erosion, and then secondly, as they start to decay, the leaves add compost to the box.

The garden boxes that we leave empty without any winter plantings are just amended with some well rotted cow manure and compost, and the soil is turned over, leaving the box set for early planting in March the following year. You can leave the amendments to the following spring, but I like to do it in the fall so that as soon as the ground is workable, I can plant.

For the many dozens of planters that housed flowers or vegetables, we remove the soil and add it to our raised vegetable garden. We turn the soil over and leave it for early planting the next spring. The potting soil has vermiculite or perlite and adding it to your garden soil will help with the quality of your soil.  Once emptied, I like to clean the containers and put them away in the garage, as this will prevent the cold weather from causing cracks in the containers. I do, however, leave my 3’ Mayne garden boxes half full of dirt on my deck and have not had any problems with them cracking or getting damaged.


Most of the plants that were in our gardens or pots are composted but there are some exceptions. We never compost kale, Brussels sprouts, cabbage, broccoli, cauliflower or any of the plants from the Brassica family. If you compost these plants, you may be overwintering pests like the cabbage moth which will lead to damage to the leaves of brassicas the following year.  We always, however, remove them from the garden. You may be tempted to leave the kale in the garden because it might come back the following spring. But in doing so, you may be encouraging pests like the cabbage moth, which will overwinter even in extreme winter temperatures.

One other tip to deter pests overwintering in your garden is to create hills in the garden. By doing this, when the temperature drops to the frigid, the cold is more likely to  penetrate through the soil and kill off pests.

Plants I leave in the garden boxes include herbs like parsley, thyme and sage, which will continue to hold onto their leaves even after a couple of light snowfalls and low overnight temperatures. I can usually harvest my parsley well into December.

Carrots after three snowfalls November 2020
Carrots after three snowfalls 2020

Root vegetables like carrots and beets can stay in the soil until you are ready to use them. I usually harvest carrots right up until the ground freezes, but I do have to say that I have left carrots in over the winter and have harvested them the following spring too!


Picked Nov 29 2020

I love growing celery even though it takes a long time to develop in the garden. I usually leave most of my celery in the garden until the snow accumulates. When the snow is here to stay, I harvest the remaining celery and make chicken or vegetable stock that I then pressure can or freeze  for the winter.


Now, like I said, I do take out all the brassicas plants and toss in the garbage but some I leave until the winter sets in because kale and Brussels sprouts can withstand a couple light snowfalls.  So, before you pull out the plants and discard them, get the most out of the plants by using them in your fall recipes. And when the snow looks like it is there to stay, remove the plants.


I have only touched the surface of all the information I plan on sharing with you. I look forward to expanding on this content in future blogs, and I am very excited about new topics to be covered. As we move into December and the holiday season, I will be sharing my favourite Christmas recipes and, for those that are following Cansanity for canning recipes and tips, stay tuned because the “Cansanity” has just begun!

Cansanity 2018
Fall Canning At Cansanity 2018


To salsa to get salsa – part one of my tomato planting story

Cansanity tomatoes

As I peer over my computer and gaze through the window that showcases my backyard, I notice the grey sky and the occasional snowflake falling to the ground.  I can’t help but wonder, did I start my tomato plants too early this year?

This is the salsa dance that Mother Nature and I perform every year.  When she offers seasonal weather, I easily glide through my eight counts alongside her, relaxed, cool and centered.  Our moves flow seamlessly.  This year, I wonder just how smooth we will be.

You see, I eagerly started some of my tomato plants this year from seed in the last week of March. I kept the soil damp knowing that the germinating seed would be very intolerant of dry soil and would die if the soil became dry for even a short period of time.  I kept my trays of newly planted seed pots near my warm gas fireplace and, as expected, within seven days my seedlings appeared.  When they were up, I moved my seedlings to my daughter’s bedroom (good use of a room for empty nesters like ourselves).  Even though it has a sunny south-facing window, I still placed my grow light on the plants for six hours a day, making sure that there is at least a couple of inches between the grow light and the plant.  I feel I am on track to keep to the general rule of having my tomato plants ready to be planted six weeks from the day they were seeded.  I am smug. I know that the typical last frost in my area is the third week of April and by early May I am usually golden for planting my tomatoes.  All is good, I think; I look up again and cringe at the snow.


The grow light that I have been using for the past three years on my plants ensures that I have a more compact tomato plant – this is good.  But the longer my tomato plants are in the container, the leggier they will be and this would not be good.  However, I know from past experience that if my tomato plants  become leggy, the best way to plant them is to trench plant them so that their long stems do not break in the wind.  So, I do have a plan if planting is delayed by the weather.  ( I will explain trench planting in the next tomato blog.)

Tomato
Garden tomatoes

Then, I smile to myself, as I daydream about eating those summer tomatoes warmed by the sun. I am excited about the tomato plants I chose to grow this year.  One variety called “Manitoba” is an heirloom bush determinate variety which grows a nice slicing tomato.  It is a very productive plant, but I am mostly excited about this plant because it is open-pollinated, and so I can save the seeds and use them to plant in the following years.

I have seeded a nice variety of tomato plants this year.  Some are indeterminate, and so will need to be staked and pruned for better yield, a small price to pay to have the quantity.  The Manitoba being my only determinate tomato plant will need less of my time because I will not have to stake or prune it, since it will only grow to 24” tall and only take up 24” in width.

Tomatoes 2015
Under ripe Tomatoes

I hope that you find time to plant even one tomato plant. It could be one of the most rewarding gardening projects you do this year.  If you think you missed the boat timing-wise on seeding tomato plants or would prefer to start your tomato story with a nursery grown tomato plant then consider the following things:


    • There are several types of tomatoes, including cherry, paste, slicers, and huge beefsteaks. So, choose the plants that best suits your culinary needs. I like to have a variety of tomatoes in my garden; so I grow some paste, cherry, medium sliced tomatoes and some beefsteaks.  Because I make 50-60 pints of tomato-based salsa in the fall, I do buy bushels of Roma and San Marzano tomatoes from farmers markets.
    • Tomatoes come in a variety of sizes and colours. Pick the size and colour that suits the way you intend to use the tomatoes. That is, are they for salads or sandwiches?
    • Determinate tomatoes are a smaller plant and do not require staking or pruning whereas indeterminate tomatoes need to be staked and pruned.
    • Tomato plants have a range of age of maturity. If you want a plant that will give you tomatoes earlier rather than later in the season then choose a tomato plant that is mature in and around 60 days.
    • Large plants sold in a nursery store that are already in large (1-gallon) containers will give you the earliest tomatoes.
    • If you buy small tomato plants in the small 4-cell packs, it will take longer before you will get a harvest.
    • Most importantly, do not buy a plant that has broken branches, is yellowing, or is really leggy and thin.


In the following couple of weeks, I hope that I can provide steps that will help you to have a smooth and easy experience with growing your tomatoes.  I know that planning when to seed and then when to plant tomatoes is much like a salsa dance. Much like dance, if we relax and let our heads follow without thinking too much we will succeed.

Garden fresh salad with home grown tomatoes


It just takes a pot or two…. How to get started growing vegetables or flowers in pots

Backyard top deck July 2015

I remember the summer that sparked my interest in gardening.  We had just moved into a 27-year-old townhouse which backed onto green space.  We had a beautiful south facing, shady backyard with a deck, a large maple and the privacy of tall cedar trees lining the back of the yard.  The sides of our yard were fenced from our neighbours by chain-link and on the east side of the yard stood a beautiful lilac tree.  We decided that our best option for growing flowers or vegetables was on that east side of the yard at the farthest point of the backyard.  We built a raised garden and set out to plant.  I have to say that at this point my husband held most of the enthusiasm for planting, and so he was the catalyst in our gardening adventures.  I wasn’t too optimistic that we would get very much out of our garden…. boy was I wrong.

We lived in this townhouse for five years, and every spring, after building that raised garden, we would take trips with our girls to the nursery stores in the area.  They loved the smell of the greenhouse; the first sign of colour and greenery would brighten our moods.  We would let the girls pick out the colours of the bedding plants, such as impatiens, and they even got to know the nursery garden’s cat by name – Pumpkin.


When we got to planting in the garden our daughters would get elbow deep into the dirt to help.  They would enjoy helping Dad in the garden watering and be constantly on the look-out for new growth on the plants.  We discovered early on that cherry tomatoes were a fantastic plant to grow with children.  Daily, once the plant was fruiting, the girls would “snack” as they saw fit.

Canna Lilly August 2016

So, I began to see that growing fruit and vegetables in the garden is so much more than getting food.  It was a family experience.  Every year I would learn just a little bit more until, before I knew it, we were all planning our garden as spring approached.  We all got just a little bit excited about when we would taste the first lettuce or tomato out of the garden, and with that have come endless stories and fond memories of being in the garden together.

Getting started today with growing your own vegetables will be the beginning of your gardening story, and it will be more than just growing a couple of plants.  In this time of uncertainty about what is happening in the world you can be assured that you are also doing your part in helping not only your family but your country.

Romaine lettuce and flowers July 2018 in Mayne container

When you grow your own herbs, fruit, and vegetables, you eliminate all the fuel spent and pollution created in transporting that food to your house.  When you improve your garden soil by composting, you remove vegetable waste from the municipal landfill.  Also, you improve biodiversity by creating a habitat that is friendly to microbes, earthworms, pollinators (like bees), and birds.  And, importantly, you improve the food security of your country by removing some of the demand on the food supply – freeing those resources for people who cannot grow their own food.

Today on April 7, 2020, it may seem early to be starting to prepare your pots for transplanting vegetable or flower plants but, in fact, it is the ideal time.  To get started you need to purchase the appropriate size pot.  I have a variety of pot sizes ranging from 9” diameter to 16” diameter.  A 9” diameter pot will only support about 3-4 small plants, and I would only recommend planting small flowers such as pansies.

Gerber Daisies, potato vine, coleus and dusty miller

Ideally, you will purchase a 12” diameter pot, as this will allow you to plant a variety of plants over the years.  You could easily plant a pepper or tomato plant, or if you prefer to plant flowers, a pot this size will allow you to plant 6-8 small plants.  Now when I say a 12” diameter pot, I am referring to the top diameter.  You want to make sure that you have a depth of at least 8”, as a small pot will really heat up in mid-summer.  If you have a shallow pot and want to plant many plants then you will need a larger top diameter 14”-16”.  This will allow a good volume of soil to support the plants.

If you want a low maintenance, weather tolerant, super functional planter, I would recommend a resin (plastic) planter that has a build-in water reservoir.  I have several of these containers around my backyard in a variety of sizes.  The manufacturer, Mayne, has quality planters of this style.  In fact, that is the brand that I purchase for use in my backyard.  I have three 35.6” x 20” Mayne black containers on my deck, and I have grown, peppers, tomatoes, lettuce, tarragon, basil, lemon verbena and even strawberries in them.  The built-in water reservoir is a time saver for you.  In the heat of the summer, I would only have to water these planters at most twice a week.  In contrast, the clay pots, even at 14” in diameter, may require a daily watering.


Let’s talk soil.  You want to create a soil in your container that has the nutrients that the plants need, so as to minimize the need to fertilize and, at the same time, maximize the capacity to hold water, which is especially important in the heat of the summer.  I don’t think that there is necessarily only one right recipe for potting soil, but here is what works for me.  I like to include some “living” soil in the pot.  By “living” I mean soil that contains the microbes and other soil creatures that you would naturally find in a garden.  So, I fill a third to a half of the container with soil that I “borrow” from my garden (I will return it in the autumn).  I then mix compost or manure into the pot (about a quarter to a third of the container’s volume).  This will be less dense than the garden soil and helps with both nutrients and water retention.  For the remainder of the container, I use a potting soil.  The potting soil will contain a fertilizer – either natural or chemical – and things like peat, perlite, and vermiculite, which help with water retention.

I hope this blog inspires you to begin your gardening story.  Even if you start this adventure with just one pot and one plant this year, you can take satisfaction in knowing that you did it!  Here’s hoping your experiences bring you joy and fond memories.

Backyard deck with tarragon with flowers in Mayne container and potted basil, rosemary and annuals July 2018


Why build a cold frame for growing vegetables and the supplies you will need


In the southeast corner of our backyard, we initially had a vegetable garden which was 15’x15′ at ground level.  This garden was sufficient for the first couple of years we lived here because there was only a 20’ maple tree to one side of the garden and some 5’ blue spruce trees towards the back of the yard.  But, as our interests in adding more edible landscaping to our yard grew, so did the number of plants growing in this particular area of our yard.  We added a tall lattice in the corner and planted three grape vines, and we also added three gooseberry plants, raspberries and some rhubarb.  All these plants were now competing for soil nutrients and water.  In the spring, we would go to turn over the garden and find the maple roots were hard to work around.

Here is where the idea of building some raised gardens in the yard made sense.  I knew that, not only did I want to make it easier to work in the spring, I also wanted to increase the number of vegetables I could plant and also add some interesting focal points to my yard.


At this point in my gardening life, I had owned three houses and created different vegetable gardens at each of these locations.  I had read several books describing how to square foot garden and so set out to design a cold frame that would be efficient for growing the vegetables that I cherished most.  These included, radishes, onions, lettuces, spinach, kale, beets, carrots and leeks.

In planning my edible landscape, I knew I wanted garden boxes that would allow me to plant my vegetables as early as possible and also allow me keep the plants going right up until the winter.

I decided we would start with one cold frame with a hinged, but removable, Plexiglas lid.  Once I knew how many vegetables I could get out of the first cold frame, I could add one or two boxes each year.  As of March 2020, I have two with lids and two without lids in my backyard.

Now that I have given you the background on why and how we made the decision to get into raised beds, here is what I would suggest you do.  It is ideal for plants to have soil that is as alive as possible, meaning good microbes, worms etc. So, with this in mind, build your cold frame at least one month before planting in it.  If you have an existing garden and can take some live soil out of it to partially fill your cold frame that is ideal.


Here is what you will need to build your own cold frame:

  • Lumber. The amount and dimensions you need will depend on how large the cold frame will be.  I just use standard spruce lumber – easily available at any building center.  You want to build the cold frame large enough that it won’t dry out quickly during the hottest days of summer.  I would suggest that, at a minimum, you make it tall enough to allow for the soil to be eight inches deep; if you are going to plant large plants (like tomatoes) you will probably want 12 inches of soil.  As for the width, I like 36 inches.  This provides space for six lettuce plants across, and yet it is not awkward to reach all parts of the surface.  The length is more of an aesthetic choice.  So, for example, with my first cold frame, I made it 24.5 inches high, 36 inches wide, and 72 inches long.  I wanted the top to be sloped when the cover was down.  So, while it was 24.5 inches at one end, it was only 20.5 inches at the other.  You may be thinking that 24.5 seems like an odd choice – why not 24 inches.  Well, standard lumber has a half inch planed off to make it smoother.  So, I used two 2x10s and one 2×6 stacked on top of each other to build the sides.  But, a 2×10 is actually 1.5×9.5 and the 2×6 is actually 1.5×5.5, which means the sides were 9.5 + 9.5 + 5.5 or 24.5 inches.
  • Paint. Use a latex exterior and put on at least two coats.  I don’t use treated lumber for the cold frame, as I don’t want any chemicals leeching into the soil.  So, the paint is needed to protect the wood from insects, water, and sunlight.  The paint is also an opportunity to add a splash of colour, which you might really appreciate in the winter.  Once the wood is cut to the appropriate dimensions, I paint it before assembly.  In that way, I ensure that all parts of the wood are covered by paint.
  • Landscape fabric. Once the cold frame is assembled and in place, I lay landscape fabric on the bottom.  I use enough so that it curls up and covers an inch or two of the sides.  This will help hold the soil in when the cold frame is new.  Eventually, the cold frame will settle firmly into the ground, but when you first build it, there may be some gaps around the bottom.  Landscape fabric will allow water to pass through.
  • Clear plastic sheeting. You can find this by the roll at the building center.  I use this to line the inside of the cold fame.  It keeps the wet soil from directly contacting the wood sides of the cold frame.  You will want to leave a gap between the top of the soil and the top of the cold frame.  So, only line the sides as high as you need to.  For example, in my first cold frame, I wanted the soil to be about 12 inches deep.  So, I only lined the sides up to the 12-inch mark.  In that way, you will only see the painted wood above the soil line.
  • Soil. This is where you can apply your own recipe.  One thing I would suggest, however, is that you include some soil from another garden in your yard.  If all you use is bagged soil your garden will lack important soil microbes.  So, I always like to add some living soil.  I also like to include compost and manure.


Keep in mind if you are planning on building your cold frame in April and then using it in May you just have to build the box part and do not have to worry about building the lid until the fall or next spring.  Better to get the soil into the box and let it settle for a month so you can get to the planting.

Why do you need to wait a month before planting?  If you have added compost to the box, and you should, you should allow the microbes a chance to break down the compost, in particular the nitrogen.  If you plant seeds directly into the bed after adding all the soil the process of the microbes breaking down the compost might interfere with germination.


Lettuce and kale are not the only plants that you can start in March indoors from seed

seedlings in cold frame
Seedlings planted in the cold frame

Yesterday, I posted a video about how to start lettuce and kale plants from seeds. Once you have planted the lettuce and kale seeds, place them in a warm place in your house and water the soil when it is dry.  The seedlings should sprout in just a couple of days.  If you have a south facing window, put your seedlings near that window during the day so that the plants can get some filtered sun.

Before the plants can be put in the garden, they must be hardened off.  This is simply the process of acclimatizing the seedlings to the outdoor conditions.  Having been inside, they will sunburn easily and they are not strong enough to withstand the wind.  So, start by putting the plants outside for an hour out of direct sunlight and sheltered from the wind.  Then gradually expose them to more sunlight and wind.  For example, you could put them out in the morning sunlight, which is less intense for an hour one day, followed by 2 hours the next day.  Once they tolerate morning sun, allow an hour of midday sun and increase that over the coming days.  If the seedlings are getting too much intense sunlight, you’ll see a bleaching of the leaves, which can turn brown if they get burnt.  Similarly, you will want to acclimatize the seedlings gradually to the cooler evening temperatures.  They should be ready to transplant after a week.

Then, once the weather is around zero degrees at night, I plant lettuce and kale seedlings in my cold frame which has a Plexiglas lid that I can close at night to trap the heat.  When the weather is 10 degrees or more during the day, I prop the lid open to allow some air flow.

If you do not have a cold frame and want to plant them in a container or in your garden, then first, make sure your seedling has 3-4 true leaves and for best success plant after the last frost in the spring. 

Additional plants to consider starting from seeds indoors in March are:

  • Arugula, broccoli, cauliflower, cabbage, onion, peppers, tomatoes, eggplant and sweet potato.
  • Parsley can be started as well.

Because tomatoes and peppers need a long growing season, I start them indoors about 6 weeks before I plant them in the garden.  So, I’ll use a larger container – 4-inch pot, for example.  But the planting method is basically the same as kale or lettuce.  To increase my odds of success, I plant two seeds in each pot and simply trim one with scissors, if both germinate.

I usually start celery in March indoors because it takes 20-30 days for the seeds to germinate and so you might need 10-12 weeks before they are ready to be transplanted.  Transplant celery carefully, it is a little more delicate than the other plants listed above.


I have planted arugula from seedlings and also have directly sown the seeds in my garden.  The best success I have had was from transplanting seedlings and so that is usually how I plant this vegetable.  If you haven’t tried arugula fresh from the garden, you must!  I find that the fresh picked arugula has a more pronounced peppery flavour.

Broccoli transplants extremely well. I have had great success with broccoli and would definitely recommend starting some plants from seed.  The plants themselves can take at least a square foot in your garden so make sure you plant wisely and only seed the number of plants your garden can support.

I generally do not plant cauliflower in my garden, as it takes a long time for the head to form and I have had problems with pests growing this vegetable; so this is one that I pick up at the farmers markets in the summer time.  Hey, if you have had success with this vegetable in your home garden, great!  I would love to hear some advice on growing this vegetable.

I love growing cabbage plants and Brussels sprouts!  They are fairly easy to grow and look fabulous in the garden, especially Brussels sprouts.  I have had some years where my Brussels sprouts have turned out great and some years where the plants have done very poorly.  I still recommend trying them because they are just beautiful, almost stately plants in your garden.


Onions are fabulous to have in a home garden! It is so nice just to pop outside and pick a fresh onion for a salad or a meal you are about to prepare.  I like to cheat a little bit and plant the onion sets at the end of March which usually you let grow to a mature palm size onion. However, I pick some early and just use them as you would green onions.  Alternatively, you can plant onion seeds and grow them into seedlings indoors and then transplant them once there is no longer a risk of a frost.

I have not yet tried to grow eggplants from seed but have had great success growing eggplants from nursery garden plants.  You do need a good amount of summer to grow this fruit.

Last year, I picked up sweet potato vines from a nursery and was extremely pleased with the results of growing this vine.  The potatoes were small but very yummy!

In March, I can’t hardly wait for fresh parsley from the garden. So, I do like to get a couple of these herbs started, as well. I grow Italian parsley and find this herb super easy to grow.  Seed many plants, you will not be disappointed! 

Lettuce after a few weeks